Showing posts with label Christmas. Show all posts

Friday, November 25, 2022

Holiday Gift Guide 2022

The gift-giving holidays are approaching faster than most people would like, so I thought I'd make a few recommendations for those of you who might be shopping for small appliances and other kitchen-y items. Everything listed below is something that I own and love and would buy again if I had to. I've had some of them for DECADES and they're still going strong, so I'm not in the market to buy replacements just yet. Actually, we Minxes aren't doing any gift exchanges this year, which is a relief to both the wallet and to the brain. After giving my brother a set of green pans and a toaster oven last year, an Instant Pot the year before, AND he has custody of my Ninja Foodi grill/air fryer thingy, so I'm sure he doesn't need anything else. And my brother-in-law is impossible to buy for so we usually resort to giving him an adult libation. Mr Minx and I tend to receive booze and books, which we both appreciate, but there's already too much of both in this house. (My goal for the rest of the year is to finish three partial bottles of spirits and get them into the recycle bin. There are four bottles of various rums that are excellent candidates for this project. And we're making a trip to The Book Thing this month to donate a couple boxes of books.) 

Since I'm not giving anything this year, and I LOVE to give gifts, I'll just have to live vicariously through all of you. Leave a comment and let me know what you're planning to gift this year, especially if it's something from the list below.


I got my first food processor in the 1980s, the classic bulky Cuisinart. It's great, but it's too big to keep on the counter, and too heavy to continually bring out of its storage cupboard every time I feel like making hummus. Enter the Mini-Prep, which doesn't take up much room and holds the perfect amount of hummus or muhammara for a two-person household. I use mine at least once a week, especially in the summer when the basil and mint are growing like crazy, or I have other green herby stuff that would make a good pesto.

This guy is sleeker than my squared off model from the aughts, but my little old guy still works, so why buy a new one? Not just yet, anyway. When I do, this is the one I want.

We got a classic Waring blender for a wedding shower gift 22 years ago, and it's my go-to for most things that need liquifying, gazpacho, for example. But then I got on a protein smoothie kick, making them for breakfast and occasionally lunch 5 days per week. Cleaning the Waring was annoying, as the blade is attached at the bottom of the jar and not removable, and the jar itself is heavy glass. So Mr Minx bought me a Jusseon smoothie maker, which comes with two sizes of plastic jar, and a screw-off blade. There are even caps to turn the jars into to-go cups, so there's no need to dirty a glass. 


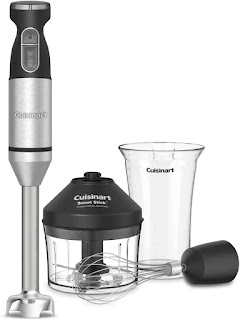
Decades ago, my Dad brought home a Cuisinart immersion blender, which my Mom dismissed as another useless kitchen gadget that would take up room. And in her kitchen, that was definitely the case. Somehow, she never required a blender or food processor of any kind. (I guess we ate a lot of chunky foods back then.) When I moved out of my parents' house, I took the immersion blender (along with the dining room table, some sofas, and more). I still have it (and the table), and I use it to smooth out soups and gravies regularly. It can also be used to make homemade mayonnaise. This newfangled model comes with a chopper/grinder and whisk attachments that make it much more versatile. Again, my old late-80s version works just fine, so I won't be getting a new one anytime soon. But you or someone you love might need one. Right now.
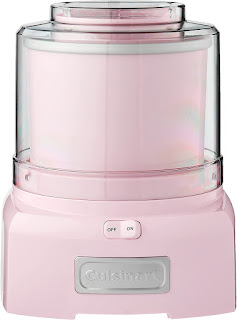

I've had a frozen-capsule-style ice cream maker since Donvier came out with their plastic crank handle jobbies in the 80s. Cranking ice cream is a PITA, so I abandoned that old one for a new-fangled electric model that essentially does the same thing. Before I make ice cream, I have to make sure there's room in the freezer for the capsule--which usually means I have to cook/reheat a bunch of stuff, as the capsule isn't small. After a couple days, once I'm sure that thing has frozen solid, I make my custard and commence to ice cream making (and eating).
If you're really into ice cream, you can buy the capsules separately and store them in the freezer for whenever the mood strikes and make two flavors at once! (Also, you need to not have an overfull freezer.) My Cuisinart ice cream maker is red, but I do like this baby pink one. (Other colors are available.)


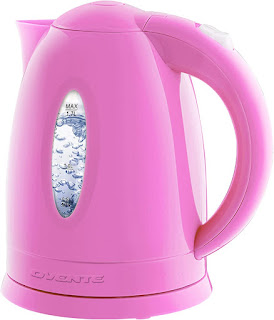
Another item I ordered because it was pink (though I was tempted by the lime green model!) is this Ovente electric kettle. We drink a lot of hot tea here at Casa Minx, all year 'round. Sometimes we just brew loose tea in the Mr Coffee, but other times we don't need that much tea. For instance, when I want a cup of chamomile before bed. Yes, I know I can put a cup of water in the microwave and magically have hot water a couple minutes later, but I've had a mug explode before. Dummy me didn't check if it was microwave safe, and it wasn't, and now I'm a bit hesitant to try again. So I just boil a pot of water in my cute electric kettle. 


* Any products in this post that are mentioned by name may have been provided to Minxeats by the manufacturer. However, all opinions belong to Minxeats. Amazon links earn me $! Please buy!

Posted on Minxeats.com.

Friday, January 25, 2019

Flashback Friday - Pumpkin Seed Brittle

flashback friday graphic
This post originally appeared on Minxeats.com on January 20, 2014.

-----------------------------------------

In 2012, I made caramels for the first time; they turned out so well, I promised myself I'd try other candies in 2013. I don't know why I drive myself so crazy with making holiday treats, but I do (especially considering how few gift recipients I have). I'm sure cookies and fruitcake would suffice, but even more sweet stuff is better, right? Fudge! Brown sugar caramels! Mini chocolate orange loaf cakes! Bacon jam! And pumpkin seed brittle!

Why pumpkin seeds? Because my dear brother has nut allergies, but can eat seeds. I searched the Interwebs for a fairly simple recipe and came up with this one at Food 52. I didn't have enough allspice on hand, so rewrote the recipe using the amount I used. I also added a bit of cayenne pepper, for a nice kick.

A few days after Christmas, my Dad called and said, "What is this stuff I am eating? It's crunchy and spicy and like heaven in my mouth!" So apparently my alterations were a hit with the parental unit. I thought it was pretty fabulous, myself.

If you try it, don't skimp on the salt.

Pumpkin Seed Brittle (adapted from Food 52)

1 cup shelled pumpkin seeds
1 1/2 teaspoon cinnamon
1 1/2 teaspoon ground ginger
1 1/2 teaspoon ground nutmeg
1/2 teaspoon ground allspice
1/8 teaspoon cayenne pepper
1/4 cup unsalted butter
1/2 cup packed brown sugar
1/4 cup maple syrup
Kosher or sea salt

Pour the pumpkin seeds into a dry skillet. Turn the heat on to medium-high and toast seeds, shaking pan frequently, until seeds have started to turn from greenish to brownish and are plump. Remove from heat and pour seeds on a plate to cool.

Measure out the spices and toss with cooled pumpkin seeds.

Combine butter, sugar, and maple syrup in a saucepan over medium heat. Using a candy thermometer, boil mixture until it reaches 280°F. Carefully pour in seeds and spices and stir. The mixture may clump up a bit but keep stirring until it smooths out. Continue cooking over medium heat until the thermometer reads 300°F. If the mixture smells like it's burning before it reaches 300°, remove from heat anyway.

Once the candy has reached 300° (or smells like its burning!), pour onto a Silpat-covered cookie sheet and spread out to a thickness of about 1/8" - 1/4". Sprinkle with sea salt while it's still warm.

When completely cook, break into pieces. Store at room temperature in tightly covered containers for a week or two.

Posted on Minxeats.com.

Friday, December 14, 2018

Happy Holidays!


Minxeats will return in January with more recipes and restaurant posts! In the meantime, we hope the rest of 2018 treats you well.

Posted on Minxeats.com.

Monday, December 10, 2018

Best Ever Rolled Sugar Cookies

Sugar cookies seem pretty simple, right? Just flour, sugar, butter, vanilla, and eggs. The ingredients might not vary much from recipe to recipe, but the proportions sure do. I've seen recipes that involve 2 cups of sugar, 5 cups of flour, and only 1 1/2 cups of butter. Also ones with less sugar and flour but also less butter. And none of them seem to have very much vanilla, which should be the main flavor component.

Personally, I'm not a fan of making rolled cookies. Too much work. I'm a drop-by-spoonfuls kinda gal. But Mr Minx had a hankering to make rolled cookies. He even went out and bought a rolling pin. If he was going to do all the heavy lifting (or rolling), then I was willing to go along with it. I even had a recipe at the ready.

Years ago, I had a group of friends that got together at the holidays. One of these friends is no longer a friend because he's a big jerk, but at the time he had a girlfriend who liked to bake. Her contribution to the party that year was sugar cookies...the best damn sugar cookies I have ever eaten. Though I would probably not make them myself due to my aversion to rolling pins and hard work, I asked her for the recipe. It has moderate amounts of sugar and flour, a cup of butter, and a whole tablespoon of vanilla. I think that's the secret right there. They are sugar cookies with actual flavor.

The dough needs to be refrigerated before baking, otherwise it's too soft to roll and cut. But once chilled, it cuts like a dream (especially with sharp, brand-new, cookie cutters like ours) and bakes up into lovely crisp and buttery cookies redolent of vanilla that can be iced or, if you're lazy like us, sprinkled with festive sugars.

Laura's Sugar Cookies

3 cups all-purpose flour
1 teaspoon salt
1/2 teaspoon baking soda
2 sticks unsalted butter at room temperature
1 cup granulated sugar
1 tablespoon vanilla extract
2 large eggs

Sift together flour, salt, and baking soda (or dump it in a bowl and stir thoroughly with a fork). Set aside.

In the bowl of a stand mixer, combine butter and sugar. Beat on medium speed until light and fluffy, 2 minutes or so. Scrape down the sides of the bowl with a spatula, then add the vanilla and eggs. Beat until combined, another half minute or so. Turn the mixer off and add the flour mixture all at once. Beat at low speed until all the flour is incorporated, another minute or so, scraping the sides of the bowl once or twice. If the dough seems too stiff for your mixer, use a wooden spoon and combine by hand.

Cover the bowl and refrigerate dough about 2 hours, until firm. If it's in the fridge for longer and becomes rock hard, allow to sit at room temperature for about 30 minutes before rolling.

Preheat oven to 375°F.

On a floured surface, roll the dough to a thickness of about 1/8-inch. Sprinkle with flour as necessary to keep the rolling pin from sticking. Cut dough with cookie cutters and carefully transfer each to a parchment-lined baking sheet (use a spatula). Sprinkle with colored sugars.

Bake for 6-8 minutes, until firm and only vaguely golden (they should not brown very much). Use a spatula to transfer cookies to a cooling rack.

Makes about 6 dozen cookies.

Follow on Bloglovin

Posted on Minxeats.com.

Monday, December 03, 2018

Gingerbread Linzer Tart

I made the original variation on this tart (with chocolate cookies and raspberry jam) 20+ years ago. I have no idea where I got the recipe, but every once in a while I pull it out and make it for dessert. It's pretty simple, and the results are delicious. Last year, I decided to tinker with the flavoring a bit. Rather than chocolate cookies and cocoa powder, I opted to use gingerbread cookies and spices. I almost made a cranberry curd for the filling, but I was stressed out and feeling lazy, so I used a jar of Polaner seedless blackberry All-Fruit. Everyone seemed to like the variation, so I thought I'd share it with you here.

A baking note: The butter tends to ooze out of the bottom of the pan, so it's a good idea to bake this on a foil-lined baking sheet. If you use a tart pan or baking dish without a removable bottom, you won't have this issue, but it will also be a little harder to cut into wedges and serve.

Gingerbread Linzer Tart

1 1/2 cups almond flour
1 1/3 cups gingerbread cookie crumbs (I used Pepperidge Farm Ginger Family cookies)
1 cup sifted all-purpose flour
2/3 cup granulated sugar
1/4 teaspoon ground ginger
1/8 teaspoon ground cloves
2 sticks unsalted butter, cut into bits
1 whole egg
1 jar Polaner All-Fruit seedless blackberry jam, or your favorite blackberry jam
1/4 cup sliced almonds

Place ground almonds, cookie crumbs, flour, sugar, ginger, and cloves into a large bowl and mix well. Distribute the butter over the mixture and add the egg. Work the dough with your fingertips, rubbing in the butter and making a smooth dough. Wrap the dough in plastic wrap and refrigerate for at least 30 minutes and up to two hours.

Preheat the oven to 350°F.

Pat about 3/4 of the dough into the bottom and up the sides of the a 9" tart pan with removable bottom. Spread the jam thickly over the crust but not quite to the edges. Roll pieces of the remaining dough into strips and arrange on jam in a lattice pattern. Sprinkle on the chopped almonds.

Bake for 35 minutes. Let the pastry cool completely in the pan.

Carefully remove the sides of the pan. The crust is fairly sturdy, so this shouldn't be a problem. You can use a knife to coax the bottom off the tart, but I usually just leave it there. Place the tart on a serving plate and cut into wedges.

Serves 12.

Follow on Bloglovin

Posted on Minxeats.com.

Monday, December 25, 2017

Merry Christmas!


We're taking the rest of the year off. See you in January 2018!

Monday, December 18, 2017

Maple Walnut Biscotti

In my family, one either likes biscotti or they don't. My Dad and I have always been fans of the Italian cookies, the crunchier the better. (So much nicer to dip into coffee or tea if they don't immediately fall apart!) I have made them now and again, and he and I are pretty much the only consumers. Mr Minx has always contended that he does not care for the cookie. Until now.

I wanted to get a head start on making biscotti for Christmas, along with all the other various cookies we always bake, and thought I'd try a new recipe. I found one from King Arthur Flour that sounded great--maple walnut. I love both flavors, and we happened to have both ingredients on hand. I still had some of the little sample bottles of Runamok Maple syrup that I picked up at the Summer Fancy Food Show last year, each containing about 1/4 cup. The recipe called for 1/4 cup of syrup, so it seemed like kismet. But the only flavor we had a full bottle of was the Rye Barrel Infused one. Which of course tastes and smells like rye whiskey. So I sloshed in a wee bit of Old Overholt, too.

These biscotti are super crunchy, with a subtle maple flavor and a hint of something-something from the rye. Mr Minx ate several without my prompting, proclaiming them "very good." Perhaps he is coming around to enjoying super crunchy cookies and won't turn up his nose at them in the future. Or maybe I just got these exactly right for his tastes. In any case, they're certainly something I plan on baking again. Dad, of course, loved them too.

Maple Walnut Biscotti (adapted from King Arthur Flour)

1 cup walnuts, coarsely chopped, toasted
2 large eggs
1/2 cup granulated sugar
1/2 cup brown sugar, firmly packed
1/4 cup Runamok Rye-barrel infused maple syrup
1 tablespoon rye whiskey
1/3 cup butter, melted
2 1/2 cups AP Flour
2 teaspoons baking powder
1/2 teaspoon salt
Coarse sea salt, preferably Maldon

Preheat the oven to 350°F.

Line two baking sheets with parchment. Spread the walnuts on one sheet in a single layer and toast for 8-10 minutes in the preheated oven, until they're light brown and fragrant. Allow nuts to cool. Reserve baking sheet and parchment.

In a bowl, beat the eggs, sugars, maple syrup, and rye whiskey. Add the butter, beating well to combine. Add the flour, baking powder, and salt. Stir in the nuts.

With floured hands, pat the dough into two rectangles each about 10" long x 4" wide and 1/2" thick on the parchment-covered baking sheet. Wet your fingers and smooth the tops. Sprinkle with sea salt.

Bake dough for 30 minutes. Remove baking tray from oven and let cool for about ten minutes.

With a serrated knife, slice the loaves into 1/2" thick slices. Place the slices, standing upright, if possible, in a single layer on the second parchment-lined baking sheet. If you need more room, use the sheet that the dough was baked on as well.

Bake for 18-20 minutes, turning once if biscotti are on their sides, not at all if you were able to get them to balance upright.

Allow cookies to cool completely before storing in an airtight container.

Makes about 3 dozen cookies.

Follow on Bloglovin

Posted on Minxeats.com.

Sunday, December 25, 2016

Happy Holidays!

We're taking the rest of the year off. Happy holidays to all, and see you in 2017! It has to be better than 2016, right?

Follow on Bloglovin

Posted on Minxeats.com.

Friday, December 18, 2015

Flashback Friday - Christmas Dinner 2009

Christmas is almost here!

--Kathy

This post was originally published on December 29, 2009.
------------------
Christmas Dinner 2009

Some people make turkey for Christmas, but not me. If I never see turkey again, I'd be very happy! This holiday, my bird of choice was duck.

Meet Donald. I roasted him for 4 hours at 300°F and an additional hour at 350°F, after slashing through the skin all over. Most of the fat rendered out (and was greedily saved by me for cooking potatoes in the future) which resulted in crisp skin.


Donald was yummy.

While he was a-roasting, I prepared an appetizer of chicken-fried sweetbreads with lemon mayo.

Man, sweetbreads are a pain-in-the-tuckus to make. First they have to be soaked for a couple hours, then poached. Membrane-removal is next, followed by several hours of pressing. After all of that, I cut them into small pieces, dipped each one in seasoned flour, then beaten egg, then seasoned breadcrumbs, and shallow-fried them in canola oil. The lemon mayo was a simple concoction of 2 T mayo, the juice and grated rind of one half lemon, and a pinch of salt.

Overall, it was pretty good, although I feel I could have poached the sweetbreads just a tad longer. The texture I achieved wasn't quite as firm as the sweetbreads we ate at Volt.

The duck was a much easier preparation. I wanted to make a riff on Thai Luong's Basil Duck, so I mixed up a chunky sauce of sautéed onion, fresh basil, garlic, and a couple of tablespoons of Thai chile basil sauce.

The sides were a leek and mushroom fondue (leeks, fresh shiitake, dried chanterelle, and white mushrooms cooked in butter and olive oil until the leeks "melt" and the mushrooms are tender), and Jasmine rice.

Everything turned out deliciously, and I impressed even myself.

For dessert, I put to use some of the many cookies we had on hand and made ice cream sandwiches. This was accompanied by hot chocolate.

A shame Mr Minx and I had only one guest for Christmas dinner. It meant more food for us...which is not necessarily a good thing. [urp]


Follow on Bloglovin

Posted on Minxeats.com.

Friday, December 11, 2015

Flashback Friday - Minx Fruitcake

Fruitcake is one of those things that one either loves or hates. The majority of people proclaim to hate it, but judging from the quantity of fruitcake one sees in the shops this time of year, *somebody* likes it. Other than my Dad, that is. He'll even eat the cheap-o square fruitcake logs full of plastic-looking dyed "fruit" they sell in drug stores.

I've never been a fan of the stuff myself. Until I made my own. Years back, I made a couple of fruitcakes that I soaked in booze. The idea was to allow them to mellow in the fridge for a few weeks until Christmas came around. Unfortunately, the fridge I used had humidity control issues. By Christmas day, the cakes were both green and fuzzy, and I had to throw all that work away. Now I tend to make my fruitcakes closer to Christmas, and I don't worry about boozing them up too much

--Kathy


This post was originally published on December 23, 2011.
------------------
Minx Fruitcake

Believe it or not, people have been asking for my fruitcake recipe. I usually just give guidelines but have finally put the whole thing in one place. Please to enjoy - it really is good! (And I normally hate fruitcake.)


Minx Fruitcake

1 1/2 cups of assorted dried fruits (chopped apricots, chopped figs, cherries, pineapple, blueberries, raisins, currants, candied ginger, cranberries)
1/2 cup rum
1/2 cup dark brown sugar
1 cup whole berry cranberry sauce
1/3 cup plain yogurt
1/4 cup melted butter
1 egg
2 1/4 cups flour
2 teaspoons baking powder
1 teaspoon ground ginger
1 teaspoon ground cinnamon
1/2 teaspoon ground cardamom
1/4 teaspoon ground cloves
1/2 cup candied orange rind
1/4 cup chopped neon green or red cherries for fruitcake (optional)
1 cup assorted roasted unsalted nuts (cashews, almonds, pecans, walnuts, brazil nuts, filberts)
booze

Put dried fruit in a microwave-safe bowl and pour over the rum. Stir well, cover with plastic wrap, and nuke on high for 5 minutes. Remove from oven and set aside to cool.

Preheat oven to 350F.  Spray a loaf pan with release spray and set aside. Combine the first five ingredients in the bowl of a mixer (or use a hand mixer) and mix until thoroughly combined. Stir in the flour, baking powder, and spices. Add the macerated fruit (plus the rum) and nuts. Pour into greased loaf pan. Bake 1 hour or until a toothpick inserted into the center comes out clean.

With the fruitcake still in the loaf pan, poke holes in it with a toothpick. Pour over about 1/4 cup booze of your choice (rum is nice). Allow to soak in. Add another 1/4 cup or so after the cake has cooled a bit. When cake is completely cool, remove from loaf pans and wrap tightly in foil.

* Any products in this post that are mentioned by name may have been provided to Minxeats by the manufacturer. However, all opinions belong to Minxeats. Amazon links earn me $! Please buy!

Follow on Bloglovin

Posted on Minxeats.com.

Friday, January 23, 2015

Jamie Oliver's Comfort Food

I received several cookbooks for Christmas, and hope to talk a little about each of them here. First up is Jamie Oliver's new one, Comfort Food: the Ultimate Weekend Cookbook.

The book is thick and heavy, so it might seem that there are hundreds of recipes included. Rather, the bulk of the book is food porn--lots of pretty pictures of the various recipes included. And when I say "various," I mean the recipes are all over the place. Oliver's idea of comfort food includes dishes from India and Indonesia as well as British favorites like toad in the hole, sticky toffee pudding, and beans on toast.

I've bookmarked several recipes to try, including the three mentioned above, plus one called Bloody Mary Beef, which seems like a good thing to cook up on a cold winter day, as it spends 5 or so hours in the oven.

The first recipe to strike my fancy, however, was for quesadillas made with brussels sprouts. Unusual? Yes. But also quite good. I would never have thought of this combination, but it worked very well.

The recipe is pretty simple. I can't share it exactly as written, but it's not rocket science.

Slice up a large onion and half a pound of brussels sprouts (I added a handful of sliced mushrooms, too, because I had them). Toss them in a large saute pan with a pat of butter, or, use a glug of olive oil, as I did. Sprinkle in 1/4 teaspoon smoked paprika, 1/2 teaspoon cumin seeds, the leaves from 3-4 sprigs of fresh thyme, and a big pinch of salt. Cover pan and cook over medium-high heat for about ten minutes, stirring frequently. Remove lid and cook for another ten minutes or so, until onions and sprouts caramelize nicely. Turn off the heat, hit with a squeeze of lime juice, and scrape into a bowl. Wipe out the skillet and spray it with release spray.

Lay a large flour tortilla out onto a plate or cutting board. Top with enough of the brussels sprouts mixture to cover almost to the edges. Sprinkle with a handful of grated pecorino cheese (as per recipe), or your favorite combo of melting cheeses. I added some shredded sharp cheddar, too, since I had some. Top with a second tortilla.

Heat pan and carefully transfer filled tortillas, making sure not to slop filling into the pan. Cook over medium heat until browned and crisp on the bottom, 2-3 minutes. Flip gently and repeat on second side.

Transfer quesadilla to a cutting board and cut into 6-8 wedges. Serve with sour cream, salsa, guac, chopped green onion, whatever floats your boat. I whipped up a quick sauce with ground chipotle pepper, a dash of agave syrup, pinch of salt, and a squeeze of lime stirred into sour cream.

A brussels sprout quesadilla might seem weird, but it was really very delicious. Both Mr Minx and I love brussels sprouts in pretty much any form, so this was a big hit. We made two quesadillas for dinner and had enough sprouts and onions (and mushrooms) left over to make another one a couple days later.

Amazon links earn me $! Please buy!

Follow on Bloglovin

Posted on Minxeats.com.

Monday, January 20, 2014

Pumpkin Seed Brittle

In 2012, I made caramels for the first time; they turned out so well, I promised myself I'd try other candies in 2013. I don't know why I drive myself so crazy with making holiday treats, but I do (especially considering how few gift recipients I have). I'm sure cookies and fruitcake would suffice, but even more sweet stuff is better, right? Fudge! Brown sugar caramels! Mini chocolate orange loaf cakes! Bacon jam! And pumpkin seed brittle!

Why pumpkin seeds? Because my dear brother has nut allergies, but can eat seeds. I searched the Interwebs for a fairly simple recipe and came up with this one at Food 52. I didn't have enough allspice on hand, so rewrote the recipe using the amount I used. I also added a bit of cayenne pepper, for a nice kick.

A few days after Christmas, my Dad called and said, "What is this stuff I am eating? It's crunchy and spicy and like heaven in my mouth!" So apparently my alterations were a hit with the parental unit. I thought it was pretty fabulous, myself.

If you try it, don't skimp on the salt.

Pumpkin Seed Brittle (adapted from Food 52)

1 cup shelled pumpkin seeds
1 1/2 teaspoon cinnamon
1 1/2 teaspoon ground ginger
1 1/2 teaspoon ground nutmeg
1/2 teaspoon ground allspice
1/8 teaspoon cayenne pepper
1/4 cup unsalted butter
1/2 cup packed brown sugar
1/4 cup maple syrup
Kosher or sea salt

Pour the pumpkin seeds into a dry skillet. Turn the heat on to medium-high and toast seeds, shaking pan frequently, until seeds have started to turn from greenish to brownish and are plump. Remove from heat and pour seeds on a plate to cool.

Measure out the spices and toss with cooled pumpkin seeds.

Combine butter, sugar, and maple syrup in a saucepan over medium heat. Using a candy thermometer, boil mixture until it reaches 280°F. Carefully pour in seeds and spices and stir. The mixture may clump up a bit but keep stirring until it smooths out. Continue cooking over medium heat until the thermometer reads 300°F. If the mixture smells like it's burning before it reaches 300°, remove from heat anyway.

Once the candy has reached 300° (or smells like its burning!), pour onto a Silpat-covered cookie sheet and spread out to a thickness of about 1/8" - 1/4". Sprinkle with sea salt while it's still warm.

When completely cook, break into pieces. Store at room temperature in tightly covered containers for a week or two.

Follow on Bloglovin

Posted on Minxeats.com.

Wednesday, December 25, 2013

Happy Happy and Merry Merry!

Minxeats is taking a holiday break...see you next year!
   Have a safe and happy holiday. :)

Follow on Bloglovin

Posted on Minxeats.com.

Monday, December 16, 2013

Christmas Ale

In a previous post, I talked about how I got my brother Craig involved in brewing beer when I gave him a home brewing kit that The Minx and I received from Smithwick's. After attempting a red ale using a kit with pre-measured ingredients, Craig decided to tackle a Christmas ale using a recipe from the how-to book included with the beer making kit. Since I was curious to see how the process worked first hand, I came over to his house and we set about making Christmas ale.

Craig had already purchased all the ingredients and equipment necessary from Annapolis Home Brew. We started by measuring out the crystal malt and the black malt. The grains were mixed with 1.5 gallons of purified water and put on the stove to heat to 160 degrees F. Once it reaches the desired temperature, the mixture must be kept between 150 to 160 degrees F for about 30 minutes. Craig attached a candy thermometer to the pot to watch the temperature. After the 30 minutes was up, we transferred the wort to a separate pot for boiling. During this process, all the equipment must be kept clean to prevent bacteria from getting into the brew. Craig kept a bucket of water mixed with PBW (Powdered Brewery Wash) on hand to clean everything as we went along.


Weighing the ingredients
While all this was going on, I was busy preparing the flavorings. I zested the peel from four oranges, chopped up a large knob of ginger, measured out some cardamom, and got a cinnamon stick ready. Honey and malt syrup would also be added to the wort, so we warmed those ingredients by immersing the containers into a hot water bath. Once the wort had boiled for one hour, we added the honey and malt syrup, stirring to incorporate. Then we added some cascade hops. Another 30 minutes of boiling and we added the orange zest, ginger, cardamom, and cinnamon stick. After another 10 minutes boiling, we added a half ounce of saaz hops for aroma.

At this point, the wort needed to be brought down to room temperature, the faster the better so as to avoid bacteria development. Some people do this by putting the pot in a tub of ice, but Craig purchased a nifty device called a wort chiller. Basically, it's a coil of copper tubing with plastic tubing running off each end. One end of the plastic tubing is attached to the water tab, and the other end is placed in the sink. The cooper coil is plunged into the pot and the cold water tap is turned on. As the water flows through the copper coil, it makes the copper quite cold, thus cooling the wort quickly. Of course, the water flows back through the plastic tube and dumps into the sink. It was amazing to watch the temperature drop on the candy thermometer. We had the wort cooled from boiling to room temperature in 20 minutes.

Cooling the wort with a wort chiller.
With the wort cooled, we strained the liquid into a plastic bucket. The ingredients kits put the grains in steeping bags, but since our ingredients were loose, we used a giant strainer placed over the mouth of the bucket to catch all the gunk. We also used a siphoning tube to drain the wort from the pot to the bucket so we could control the flow. A few times in the process, we had to stop and empty out the strainer because there was so much detritus in the wort. Eventually, we got all the wort into the bucket. Then more purified water was added to bring the mixture up to five gallons.

Aerating the wort with a bubble making thingee for an aquarium.
The how-to book we were using recommended that the wort be agitated to incorporate some air in the mix. A stirring wand was provided with the home brew kit, but Craig channeled his inner Alton Brown and bought an electric bubble making device used for aquariums. After a few minutes of bubble making, Craig took a reading of the wort with a hydrometer.

In order to ascertain the alcohol percentage by volume of your brew, you must measure the original gravity* when the wort is first made and then measure the fermented gravity after the wort has fermented. You run these two numbers through a special formula to reach the alcohol percentage. The two measurements are taken with a hydrometer. Simply drop the long stick-like device in the bucket and read off the number at the surface of the liquid.

The final step is to pitch the yeast in water and add that to the wort. Then we put the lid on and added the airstop. The airstop is filled partway with water. After 24 hours, one should see bubbles in the water, an indication that fermentation has begun. The bucket needs to be stored in a cool, dark place for six days. We used one of Craig's closets for that.

After six days, the wort is transferred to a clear jug known as a carboy. They come in plastic or glass, but glass is better because it can be more thoroughly cleaned between uses. The airstop is placed in the carboy and the fermentation continues for two more weeks.

The final step is to add sugar to start carbonation and pour into bottles. Once the beer is in the bottles and capped, it should sit for at least another two weeks to develop full flavor. Although we started this process in September, we decided to wait until Thanksgiving to drink the beer. I was disappointed that the cinnamon flavor was not more prominent, but it had an interesting flavor all its own. The Minx described it as a cross between Coca-Cola and beer. We used it to make shandies for our Thanksgiving dinner and they were quite tasty.

* Gravity refers to the relative density of the wort compared to water at various stages in the fermentation. It largely depends on the amount of sugar in the wort.

Follow on Bloglovin

Posted on Minxeats.com.

Friday, December 13, 2013

Flashback Friday - 12.13.2013

This post was originally published on December 23, 2011.
------------------
Fruitcake

Believe it or not, people have been asking for my fruitcake recipe. I usually just give guidelines but have finally put the whole thing in one place. Please to enjoy - it really is good! (And I normally hate fruitcake.)

Minx Fruitcake

1 1/2 cups of assorted dried fruits (chopped apricots, chopped figs, cherries, pineapple, blueberries, raisins, currants, candied ginger, cranberries)
1/2 cup rum
1/2 cup dark brown sugar
1 cup whole berry cranberry sauce
1/3 cup plain yogurt
1/4 cup melted butter
1 egg
2 1/4 cups flour
2 teaspoons baking powder
1 teaspoon ground ginger
1 teaspoon ground cinnamon
1/2 teaspoon ground cardamom
1/4 teaspoon ground cloves
1/2 cup candied orange rind
1/4 cup chopped neon green or red cherries for fruitcake (optional)
1 cup assorted roasted unsalted nuts (cashews, almonds, pecans, walnuts, brazil nuts, filberts)
booze

Put dried fruit in a microwave-safe bowl and pour over the rum. Stir well, cover with plastic wrap, and nuke on high for 5 minutes. Remove from oven and set aside to cool.

Preheat oven to 350F.  Spray a loaf pan with release spray and set aside. Combine the first five ingredients in the bowl of a mixer (or use a hand mixer) and mix until thoroughly combined. Stir in the flour, baking powder, and spices. Add the macerated fruit (plus the rum) and nuts. Pour into greased loaf pan. Bake 1 hour or until a toothpick inserted into the center comes out clean.

With the fruitcake still in the loaf pan, poke holes in it with a toothpick. Pour over about 1/4 cup booze of your choice (rum is nice). Allow to soak in. Add another 1/4 cup or so after the cake has cooled a bit. When cake is completely cool, remove from loaf pans and wrap tightly in foil.

Follow on Bloglovin

Posted on Minxeats.com.

Tuesday, December 25, 2012

Merry Christmas from Minxeats!

May the day bring you all your heart desires. And cookies.

Posted on Minxeats.com.

Friday, December 14, 2012

Flashback Friday - December 7, 2012

This post was originally published on 1/11/2010. Seems like a good post to make a reappearance in December. Especially considering the cute Christmas-theme mugs in the photo.
------------------
Hot Buttered Rum

In the late 80s, my family started a new tradition of opening presents on Christmas Eve (possibly because Mom never could wait to hand out gifts). Because our house was so big, we set up the tree in the hallway near the front door to make sure everyone could gaze upon its Santa-festooned glory and mountain of gaily-wrapped packages on a frequent basis. The hallway was always drafty (as was the whole house) so I came up with the brilliant idea of drinking hot buttered rum as we tore through the wrappings.

We all enjoyed the warm, creamy libation - particularly my Cocker Spaniel. I had set my mug on the floor behind me and didn't notice that he had consumed several ounces of rummy goodness. Within minutes, he became a mean little drunk, snarling at the family and eventually hiding under a chair in the living room, far from the rest of us. (He apparently liked a good stiff drink on occasion and had once helped himself to a Pimm's Cup during a croquet party held on the front lawn.)

While not recommended for your canine friends, I do recommend that grownups partake of a nice steaming mug-full of hot buttered rum on a cold day. I like to keep a tub of "mix" ready in the freezer - just add rum and boiling water.

Hot Buttered Rum Mix

1 lb room-temperature butter
1 lb powdered sugar
1 lb brown sugar
2 teaspoons cinnamon
1 teaspoon nutmeg
1 quart room-temperature vanilla ice cream

Cream all ingredients together and store in a covered container in the freezer.

For each drink

1 1/2 ounces rum
boiling water
freshly grated nutmeg

Add rum and 2 tablespoons of batter to a mug (more if your mug is large) and top with boiling water. Stir together and garnish with nutmeg.


Posted on Minxeats.com.